
|
Oboe!Embouchure |

|
Embouchure is just the fancy word used to refer to the way in which a player applies the mouth to the mouthpiece or reed of a wind instrument. This simple yet fancy word, however, is the foundation to achieving the desired tone! On your oboe, we will focus on how to properly position your lips and the reed and what to listen for using the reed alone to ensure the correct embouchure is being used to produce the proper tone.
The Reed!
Even before we can attempt to form a proper embouchure, we need to make sure the oboe has a sound generator that is in top working order – the reed! If your director or private instructor has gone over this with you and you are ready to go with a reliable source of playable reeds, feel free to continue to The Process below. If not, there are a few things you should have in mind when going out to find a good supply of oboe reeds.
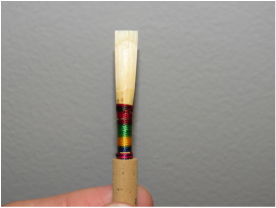
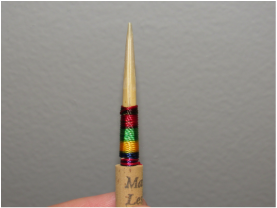
It is best to find a good source for hand-made reeds, whether it be a local oboe player or even a commercial reed outlet that advertises “hand-made” reeds. Whether you only have access to commercial reeds or are able to find a vendor for hand-made reeds, there are some important requirements for a good reed that should be observed:
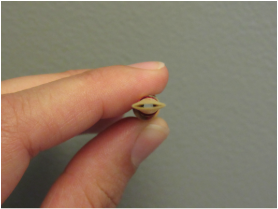
· Symmetry – When looking at both the tip and top/bottom of the oboe reed, it should be symmetrical. The more symmetrical the
reed is, the more resonant the sound will be. Likewise, the less symmetrical the reed is, the less resonant the sound will be.
· Seal – The sides of the reed must have a tight seal over the length of the reed. Otherwise, the player will need to bite in order to
create the proper seal and produce a full sound, in turn causing the intonation to be off.
· Damage – The reed should be free of any nicks or cracks. Nicks in the corners of the reed will make articulation particularly
difficult, and any cracks will make it nearly impossible to achieve the desired tone on the instrument.
It is best to find a good source for hand-made reeds, whether it be a local oboe player or even a commercial reed outlet that advertises “hand-made” reeds. Whether you only have access to commercial reeds or are able to find a vendor for hand-made reeds, there are some important requirements for a good reed that should be observed:
· Symmetry – When looking at both the tip and top/bottom of the oboe reed, it should be symmetrical. The more symmetrical the
reed is, the more resonant the sound will be. Likewise, the less symmetrical the reed is, the less resonant the sound will be.
· Seal – The sides of the reed must have a tight seal over the length of the reed. Otherwise, the player will need to bite in order to
create the proper seal and produce a full sound, in turn causing the intonation to be off.
· Damage – The reed should be free of any nicks or cracks. Nicks in the corners of the reed will make articulation particularly
difficult, and any cracks will make it nearly impossible to achieve the desired tone on the instrument.
|
|
|
The Process
|
You are going to start with soaking the oboe reed in luke-warm (better than cold) water for approximately 3 minutes. During this time, you can review the steps to correct embouchure formation. Before a practice session or rehearsal, this would also be a good time to assemble your instrument. When soaking the reed, only the visible cane should be submerged in the water. After the initial 3 minutes of soaking, you can re-dip the reed as needed – don't let the reed get too soaked! The reed must stay properly wet to avoid response and pitch problems. |

|
|
|
Imitating an English accent, say “no oboe”, bringing the corners of the mouth firm and forward against the teeth. The jaw will be separated, the chin down and firm, and the tongue down in the mouth. The “oh” and “oo” syllables will help in making the embouchure relaxed and resonant. You should avoid a tight-lipped “ee” configuration which will tend to produce a thin tone and high pitch. |
|
After the oboe reed has been properly soaked, lay the reed on the bottom lip with the tip of the reed at the line on the bottom lip which distinguishes between the wet and dry areas. Think of the lip as a firm springy cushion for the reed. |
|
|
|
Gently roll the bottom lip in so that the reed barely extends into the mouth – only 1/16 to 1/8 of an inch. |
|
Now bring the top lip down, cushioning and sealing the reed from above. Thinking “no oboe” will help keep the reed in the proper position and discourage it from slipping to far into the mouth. |
|
|
|
Now it's time to test your embouchure! Keeping the reed anchored firmly on the bottom lip, take a deep breath in and, while maintaining the proper "no oboe" shape, blow into the reed to set the blades into vibration. Some initial rushing air noises may be heard until a proper balance between the amount of support and resistance is found. Articulating with a soft “d” consonant may help with your initial experiments in producing a sound on the reed as well. The desired result is a sustained high ‘C’. You can use a tuner to check if you are getting the correct pitch, or just match the pitch and sound you are hearing here.
|
TroubleShooting
If you are not quite able to match the correct pitch and sound on the reed, don't get worried just yet! There are several things we can change and fix to help you achieve the proper embouchure and produce the correct sound! Listening to the examples below, find which one most closely matches the sound you are making and follow the instructions provided to help you get closer to the desired tone.
|
As it was mentioned above, are you only getting sounds of "rushing air", or very little sound, like in the example here? This is a very common initial problem and can be fixed with some extra attention to what you are doing with the embouchure and air. The problem is often caused by a lack of support, creating an imbalance of resistance and air intensity. This will be fixed with more air support and faster air. The embouchure could also be too loose if this is happening, in which case you will need to firm the cushion and corners of the lips to help produce the proper balance of resistance, air intensity, and focus. The bottom lip may also need to be rolled in slightly.
|
|
|
|
Is there no sound coming out at all, not even rushing air, like in the example here? No sound at all means the aperture, or tip opening, of the reed is being squeezed shut, probably by a pinching or biting "ee" configuration in the embouchure. This can be fixed by revisiting the "No Oboe" embouchure shape, focusing on feeling more "oh", keeping the teeth separated, and having less reed in the mouth (only 1/16 to 1/8 of an inch). It is also possible that the reed is too soft. If this is the case, the length and/or width of the reed can be adjusted by clipping the tip – unless you are an experienced oboe player, I would leave this type of adjusting to your director, private instructor, or repair shop.
|
|
Are you producing a 'C' that is thin and sharp, or too high, like in the example here? The embouchure may be pinching or biting the reed. Similar to the case where no sound is coming out at all, this problem can be fixed by relaxing the embouchure and rethinking "no oboe" while using more of the "oh" vowel and separating the teeth sufficiently to allow the airflow to move freely. The reed could also be too stiff or closed off. If this is the case, you may need to use some ultra fine grade sand paper to reduce the thickness of the reed, being sure to keep the cane balanced – ask your teacher to help you with this!
|
|
|
|
Are you producing a 'C' that is flat, or low, like in the example here? You may not be blowing with enough support. This will easily be fixed with more air support and faster air. The angle of the reed, and in turn the instrument, may be too high as well. If this is the case, you can try reducing the angle of the reed in your mouth. It is also possible that the reed is too soft. The length and/or width of the reed can be adjusted by clipping the tip and making the reed harder – as it was already mentioned above, unless you are an experienced oboe player, I would leave this type of adjusting to your director, private instructor, or repair shop.
|
Flying Along! ...
Now that you have mastered your oboe embouchure, it is time to move on to your First Notes!
