
|
Oboe!First Notes |

|
Now that you have learned and solidified the proper embouchure using only the reed, it is time to put the oboe together and make some real oboe sounds! Remember what your director or private instructor taught you about proper assembly of the instrument – we don't want an incorrectly assembled instrument getting in the way of our great tone! And be sure your instrument is in good working order. Old pads, bent keys, and cracks in the body are just some things that can have a negative effect on your sound. If your instrument hasn't been in for repairs in a while, or you think something might be wrong with the instrument itself, see your director, private instructor, or local repair shop for help with this.
A Beginning B-A-G Of Notes!
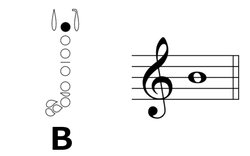
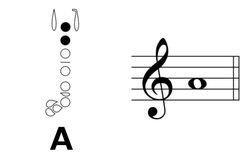
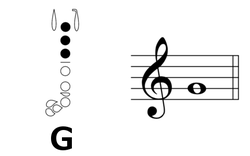
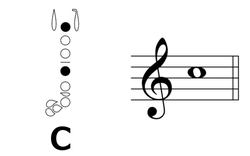
The first 3 notes you are going to be playing on the oboe as you work on good tone are B, A, and G. You may have already learned how to play these notes and what they look like on the music staff, but in case you haven't you can learn that here as well! When playing each note, remember to keep the reed anchored firmly on the bottom lip when taking a deep breath in and, while maintaining the proper "no oboe" shape, blow into the reed with a fast and supported stream of air, starting the sound with a soft “d” articulation. Examples of each note are available for you to listen to in order to get the correct sound in your ear, and you can even play along with the video to help you match the pitch and sound you are hearing.
|
|
|
|
|
|
As you are practicing and playing your B-A-G of notes, what do you hear? Are you matching pitch and sound and playing with the best tone possible? Or do you hear a lot of rushing air, sharp or flat sounds, or maybe even no sound at all? If you need to, re-visit the Troubleshooting section of the Embouchure page until you are able to master the correct tone of these 3 notes on the oboe!
Beginning Band / Method Book Notes
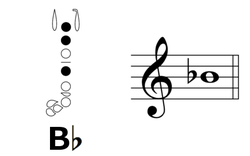
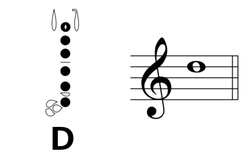
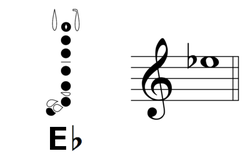
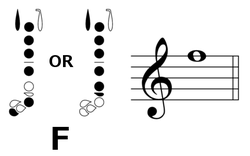
If you already are or plan on being in your school's band program, chances are you have or will receive a beginning method book. These books are designed so that students on ALL instruments can learn and play together on similar notes as they start their adventures in band! The first of these notes are usually, in concert pitch and on the oboe, B-flat, C, D, E-flat, and F. After mastering your initial B-A-G of notes, you are ready to move on to these 5 new ones! Just like before, the fingering, how it looks on the music staff, and an example of the proper sound are provided for each note.
|
|
|
|
|
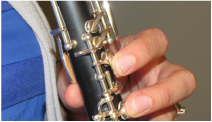
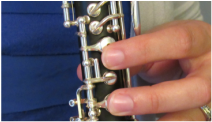
For the next two notes, you will be using what is called the "half hole technique". With the first finger of your left hand, slide the finger down while staying in contact with the key until the half hole is open. On the fingering chart, this is noted by a filled in circle with a space in the middle.
|
|
|
|
|
|
You will notice here that there are two fingerings for 'F'. The left fingering is used when going to or from notes that use the third finger of the right hand, such as 'D' and 'E-flat', and is the fingering you will want to use for the exercises you will be playing later on. The right fingering is used for all other purposes as it tends to produce the better sound.
|
|
Again, listen to the sound you are hearing as you play. If you notice any imperfections to your tone, it doesn't hurt to re-visit the basics of the "no oboe" embouchure and some of the causes and solutions for bad tone in the Troubleshooting section of the Embouchure page.
Flying Along! ...
Now that you have mastered your first notes on the oboe, it is time to go over some information regarding Intonation!
